How it all started
It was a beautiful afternoon, the sun was shining its warmth through the half open window into our apartment. Birds were singing, it was a relaxed atmosphere. I was watching a video of some guy talking about clay pots, educating myself on this elaborate subject. Everything was happy.
"So, you ready to install the new OS?"
Ah, LineageOS. It sounded boring at first. But I had honestly got a bit tired of EMUI, the official OS for the Huawei P9. I was ready to try out something new. "What is it, why is that one special? Oh, it's open source? I might as well give it a whirl."
I was confident. I'd done so many Linux installs already, I'd jailbroken iPhones, I even had already rooted the P9. I was basically an Android expert at this point, so surely installing LineageOS on the device would be a breeze. And even if not, I'd have the recovery option always available.
So I picked up my laptop and plugged my phone in via USB. Flashing TWRP on the recovery partition was easy as pie. My friend pointed out the link for the download. "Oh, it does say here it's an unofficial build."
"Eh, there's comments from people saying that it works. It's fine", I replied. "I'm not one of those people", those idiots who somehow manage to brick their phones. I went to the backup tool in TWRP, tapped on the big button that says 'Backup'. Checked all the boxes, because of course I want to back up everything. Swipe to backup! - Isn't life convenient?
I saw some red. "Should be fine, errors always happen", I thought. "Wait, no." Backup failed, it said. Something about unable to mount '/data'. A quick googling of that error didn't yield much information. People on some forum told to remount the partitions, so I did that. Tried backing up again, the same errors.
"You know what, I don't need a backup. I already have most of my stuff on the cloud anyway." That's what I thought to myself when I tapped the .zip file and looked at the installation go. Some of the lines were red at the start, but the installation kept going anyways. Perhaps it was just trying to mount the SD card.
TWRP finished the installation and prompted to reboot the phone. "That was easy!" I chuckled, relieved that the ordeal was over. Excitedly I awaited the LineageOS boot screen to appear.
It never did.
Surely you made backups, right?
Hm, okay. So the phone was stuck in the boot screen. I never had that happen before, my bet was that there was something wrong with the installation medium. "I'll do the installation again and pay closer attention to the log output." If years of battling with Linux has taught me one thing, it's that behind all of this usually lies a very simple and stupid error that just happens to snowball massively.
I rebooted into fastboot and flashed TWRP on the phone again, then booted into that. When reinstalling the zip file, I noticed it was the same error again: unable to mount /data. After some googling I decided to wipe the /data and /system partitions and reformat them again. I chose ext4 because that's my go-to filesystem on linux machines, and that's what the blog post I was following suggested as well.
"It's just a simple fix, after I get this working everything will work smoothly again", I assured myself.
Reformatting the partitions created a whole heap of additional errors. Now the program was unable to mount /data and /system. "Alright", I thought, "I'll just go to the shell and mount them myself to see what this error is about."
After playing around in the shell and not making any progress, I started to get frustrated. Better reboot back to EMUI and try again later. I rebooted and found myself sitting in TWRP again. Then the realization struck me. Of course, I had reformatted the system partition. So there was no system to boot to anymore. "Oops."
I found myself in Huawei eRecovery after pressing the volume button for three seconds at boot. "I'll just do the recovery, reinstall EMUI here and try again with a bit better time." It was comforting to push the slick circular buttons that reminded me of the operating system that had once existed on the device. Especially this one exceptionally round button, 'Recovery', written in big, friendly letters. Getting package info from server, it announced. "Whew, phone got me worried for a while there, heh.
Getting package info failed. "What?" After the third try, the realization started to slowly creep up on me. My phone wasn't working, installing a new OS wasn't working, the recovery wasn't working. I was required to receive phone calls. This was an unacceptable state for a phone to be in. And of course I hadn't made backups.
Deeper in to the rabbit hole
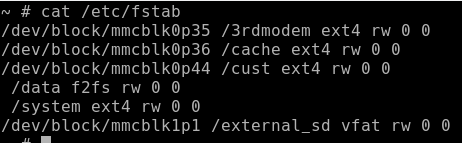
Sitting there for a while I decided to try the shell approach again. Fiddling around in the terminal I took a look at /etc/fstab, but the file wasn't sane. The partition name was empty for /system and /data, and thus the format of the mount command would be wrong and those could not be mounted. "Ah-ha! I can fix this", I declared.
I didn't know which partitions were the right ones. They were of form /dev/block/mmcblkXpY, where the X and Y were partition numbers. On a forum post I found out that the partitions I would need for /system and /data would be /dev/block/mmcblk0p43 and /dev/block/mmcblk0p8. I put them on /etc/fstab and managed to mount them without errors.
"Hurrah", I laughed. A simple fix, just like I thought it would be. "Now let me just format these partitions, and continue with the install."
The installation finished successfully, and I rebooted the phone. It booted to a debug screen containing only three primary colors, and there was an intimidating red error text saying that essential system files could not be located. I flinched in my chair. Next up the boot hanged. I restarted the phone. The three colors and the intimidating text were there again. Boot hanged again. Sweat began to gather on my forehead.
It was time to go to fastboot mode and flash TWRP again. Flashing failed, permission was denied. "What?" The phone had locked its bootloader. I felt my heartbeat rise. Further Googling for the numbers of those partitions revealed that I indeed had overwritten the oeminfo partition. I had no idea what it does, but surely it had done something vital because now nothing was working anymore.
I began searching my files for the unlock password for the bootloader. "Did I write it down? Oh crap. Has it changed? Was it stored in oeminfo? Shit." I was panicking - without the password I couldn't do anything to the phone anymore, it would be stuck in a bootloop. Forever.
All of the online tutorials to get the bootloader password for Huawei P9 told how simple it is: Step 1 is to just go to the Android Settings. I on the other hand didn't have an "Android" to go to the settings of to begin with. Additionally I didn't seem to be able to access fastboot anymore; the phone just countlessly rebooted until it would run out of battery power.
"How could I have been so idiotic? I can't believe this." An hour after another I got more and more desperate, struggling late at night, trying to revive my device. The next morning I was greeted by the sight of the most expensive paperweight I had ever owned.
A new hope
Fast forward a couple of months. The panic had settled. I had bought a cheap replacement phone in order to fulfill the requirements a phone should. The P9 was sitting inside a storage box, sparing me from the sad sight of this cold, lifeless piece of metal.
I was sweeping through a stack of A4's, being a final judge of which papers to toss and which to keep. In that pile of paper, I found something that would make me freeze in place. This was no ordinary exercise paper - I was staring at a 16-digit number, hastily written in a corner of the paper, next to some innocent math equations. "Could this be...? No way."
I cleared space on my desk like they do in the movies. I manage to get fastboot open and my phone USB connected in record time. But my expectations are low; the fact that fastboot had locked itself again probably meant that the bootloader password had changed during the wipe of the oeminfo. Maybe the partition had contained the phone's IMEI required to generate the bootloader code, and when that wasn't found, the hardware code had changed and the codes didn't match anymore.
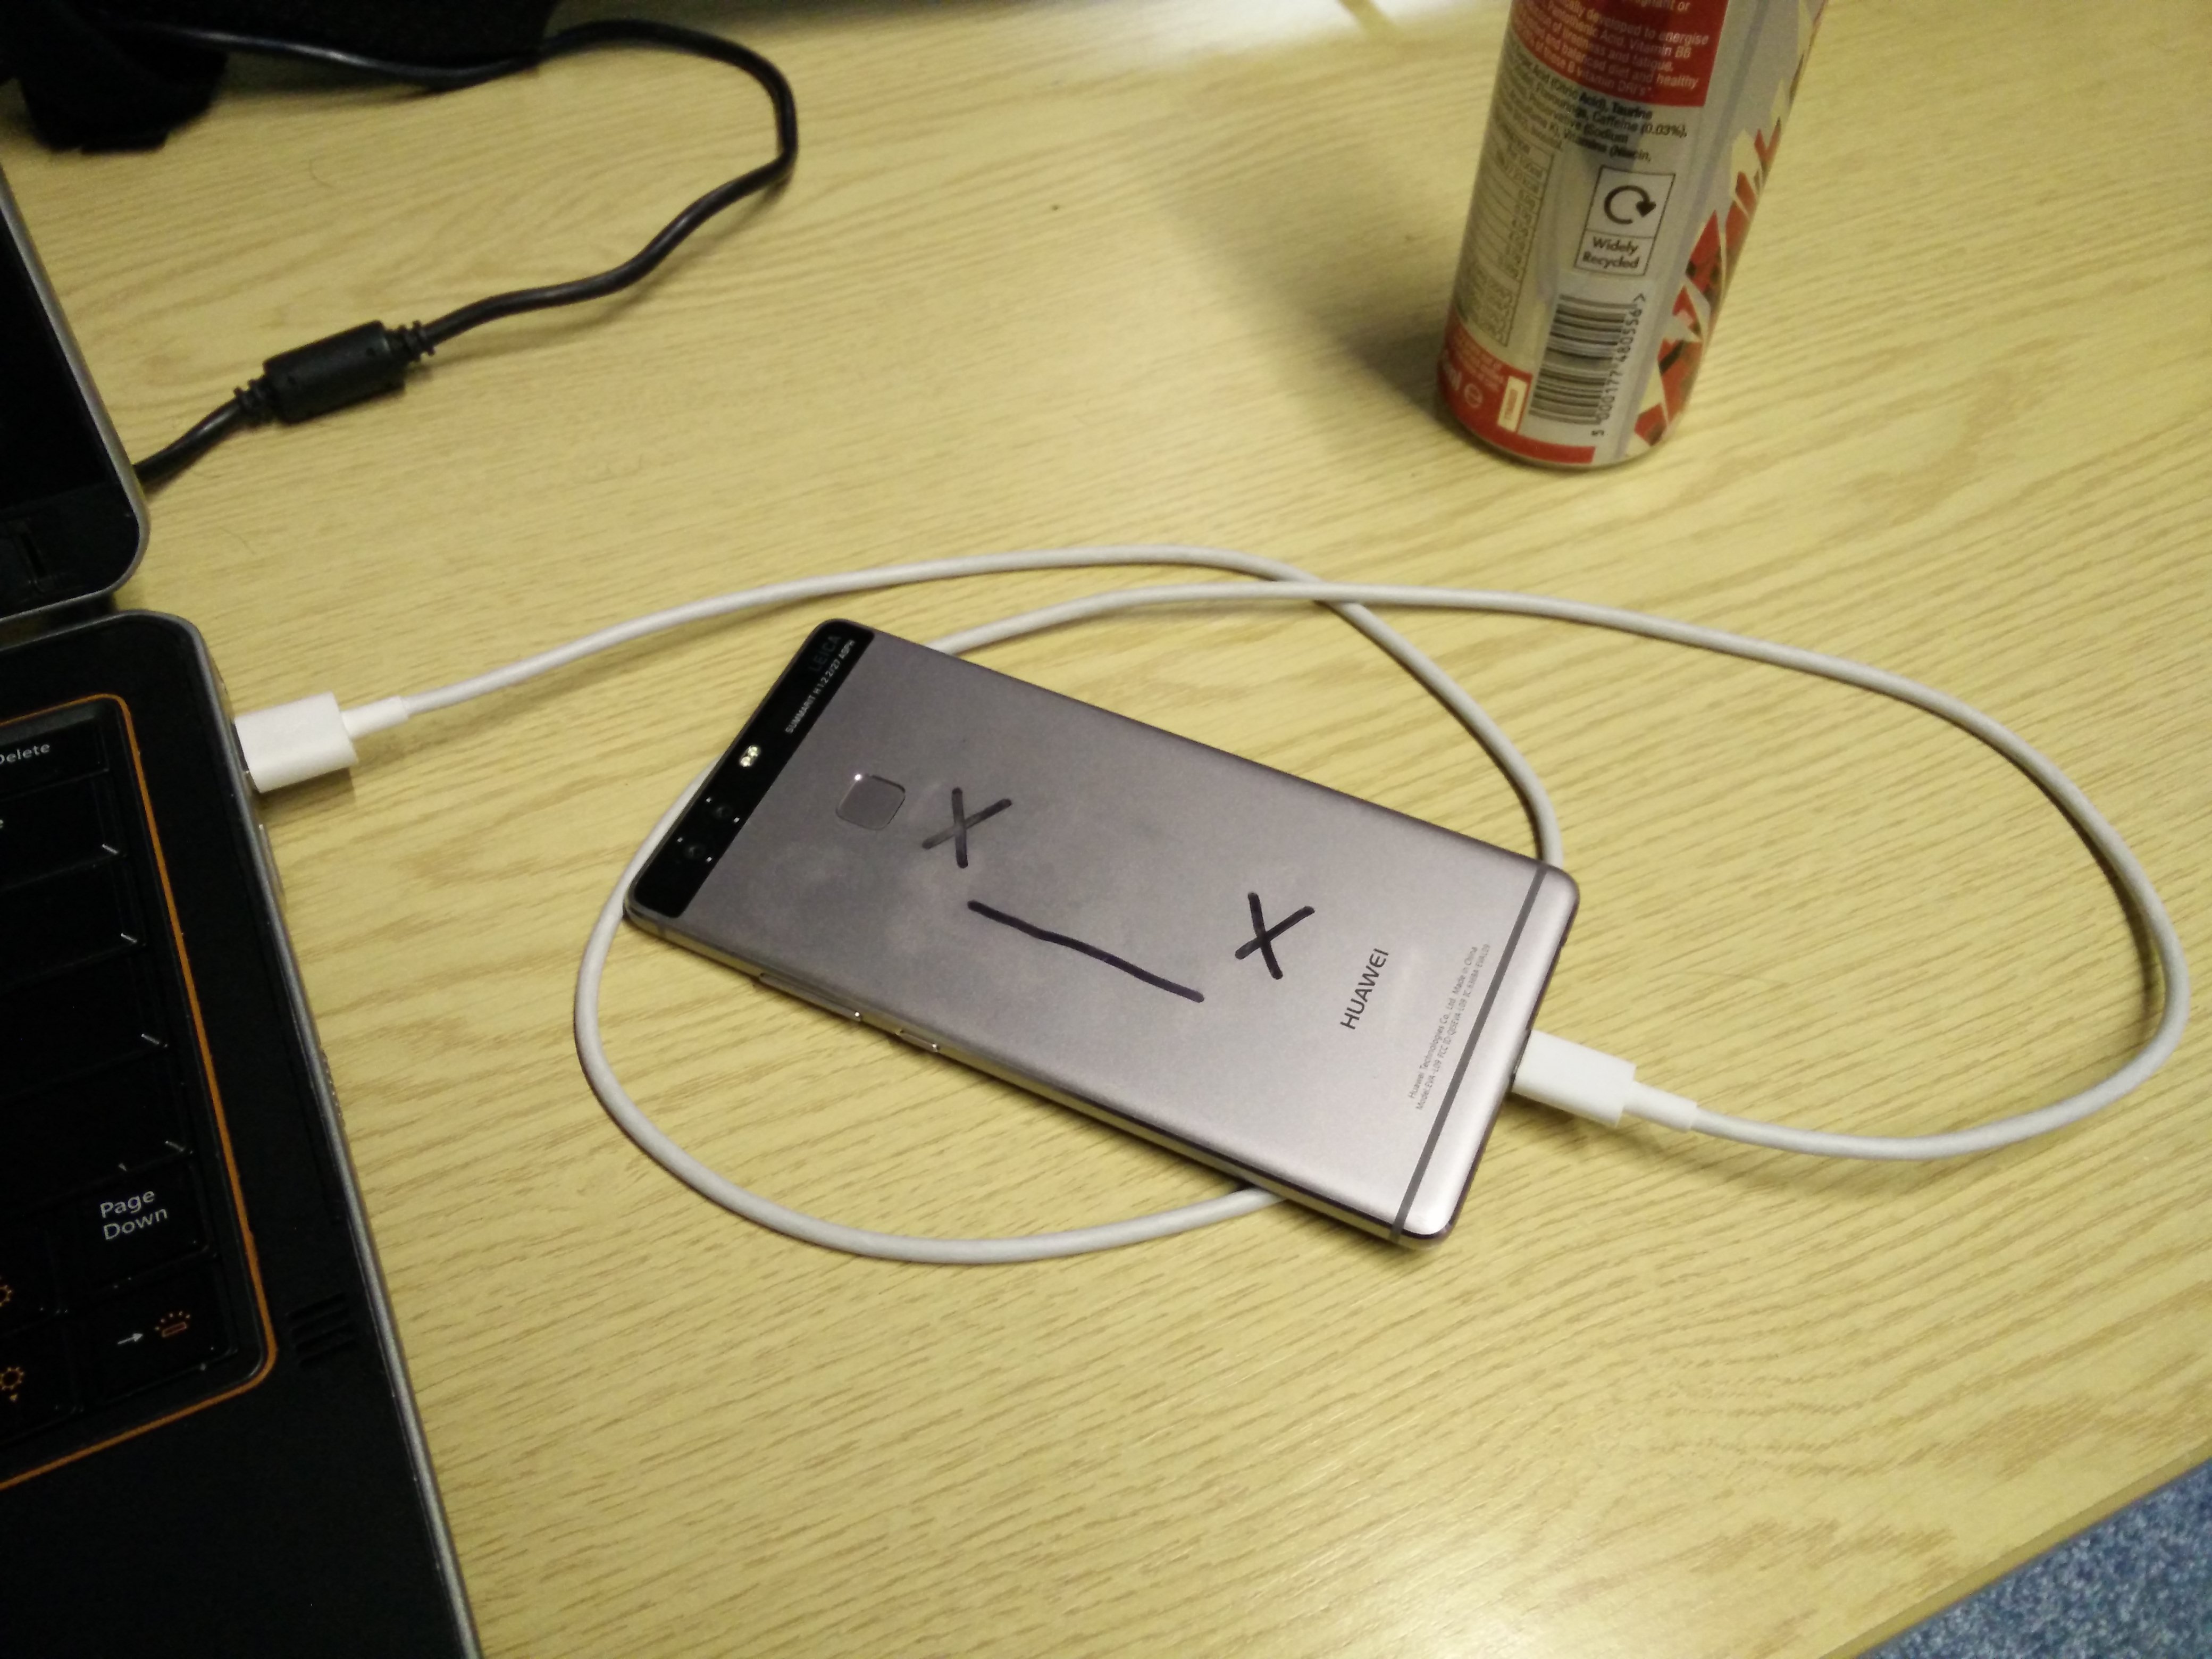
Enough speculating. After months of having used the older B-type USB, plugging the USB-C into the P9 felt so modern and convenient. You didn't even have to choose which way to put it! I took good care on making out what numbers the hasty scribblings on the paper corresponded to, typing them to my shell one by one. "This is it", I told myself, overly dramatizing every step I made. What if it wouldn't work? I didn't really have anything to lose. I'd just put it back in the box.
I hit enter. The process finished annoyingly fast, forcing me to go through the lines several times to understand if it really was successful or not. Fastboot greeted me back with a happy text: "Bootloader unlocked". Bits of hope for the future of my phone began to gather in my mind.
TWRP, I thought to myself. And partitioning. And the shell. This opens up a lot of new possibilities. Now the trick is just to not brick the phone again by doing stupid things.
The first response was to look for a quick fix. I went on several different sites, official ones, Android developer forums, shady file sharing websites. I tried Huawei's stock recovery software, that failed. I installed HiSuite, Huawei's equivalent to iTunes for iPhones. It couldn't find a phone to connect to. There were some backup images I tried to flash to the phone, but one after another those too failed to produce satisfactory results.
After countless hours of aimlessly executing meaningless recovery tools, I was back to square one.
Read only
The most absurd fact was that I had this expensive piece of hardware that I couldn't use. Were it a 'regular' computer with a 'regular' hardware, BIOS and all that, I could have had linux running on it no time. But I didn't have any tangible grasp on the intricacies of an Android phone, let alone a Huawei one.
I decided that I needed an action plan. A roadmap, if you wish. The last thing I wanted to do was to somehow re-brick my phone again. To prevent redoing my mistakes, I wrote down everything that went wrong initially. I also wrote down the tools I had access to - eRecovery, fastboot, adb, shell... The list looked quite comprehensive, actually. There was a glimmer of hope in the air, a grain of optimism stuck between my teeth.
The main rule I conformed myself to was to keep everything read only. That is, I will never ever write into a partition again, overwrite files, format stuff, while trying to "fix" a problem. I will only observe. There is a lot to learn about this device, and even if I cannot get it working, I can still poke my nose around and maybe learn something new.
My new journey began by looking around in the shell, this time paying silent respect to the # that reminded me of being root. No more was I under the falsehood believing that "everything can be reverted because eRecovery will solve all of my problems". I took extra care in what commands I typed, treading carefully across system files, taking notes as I went.
At times it felt like I was studying an alien artifact. I had no real knowledge of how stuff worked under the hood (or, more precisely, how it didn't work). It was only guesswork. Still, I managed to trace the problem a bit further than before.
Apparently on Android, /etc/fstab is regenerated at boot. /etc/recovery.fstab seemed to be the file it inherits from. One matter caught my eye - /system (which in turn pointed to the block device /dev/block/mmcblk0p43) was classified as f2fs, the "Flash-Friendly File System", and not ext4. The device was correct but the file system wasn't.
Furthermore, I found out that TWRP doesn't have the tools to format f2fs partitions. I wonder if the issue really was that simple - if everything expects the partition to be f2fs when it isn't, it would cause the fstab generation to produce insane results, which in turn would produce the mounting failures. Maybe the stock recovery processes were failing because of the same reason?
The debug colors and red text shown at boot don't look as intimidating anymore. "Can't make an omelette without breaking a few eggs", I assured myself. Whatever had happened with oeminfo, however internally broken the phone was at this point, at least I could get TWRP to boot again. At least I could access the shell. It was all that mattered right now.
Android != Linux
Looking at the situation the other way, it is actually quite a simple problem I seem to be dealing with. As far as I know, only the /system and /data mountpoints are affected. I can see their partition numbers and the filesystem they're supposed to be in, even when they're not.
So realistically the only task I need to perform is to reformat these partitions to f2fs and the fstab problem should be fixed. Obviously there could be more underlying problems, but right now my primary concern would be the most obvious one.
TWRP has a formatting menu but that doesn't have a f2fs button, which is a bit curious if you ask me. Using adb shell I try to find mkfs.f2fs and sure enough I find a plausible reason why the button isn't there. There is no binary to format f2fs partitions in the TWRP toolset.
Now I have a tangible goal to reach - to get mkfs.f2fs on the device. I'm inclined to just install Arch Linux ARM or Kali Linux and use the toolset they provide - after all, the P9 has an ARMv8 (aarch64) processor, how hard could getting a fully working linux distribution on an Android device possibly be?
Exactly, pretty hard.
An amateur's approach to Android
I had a fight with the Android SDK.
Surely it has some tools I can use to fix my problem? Well, in short it doesn't. Android SDK seems to be mostly for developing native Android apps, not fixing an Android device that doesn't even have a basic Android OS installed.
Someone on the XDA developer forum mentioned that you can actually build the GNU toolchain using the SDK - this would mean I could potentially compile the rest of the programs from source, including mkfs.f2fs.
Then again, compiling all of it from source seems like using a sledgehammer to nail a painting on the wall, and I was getting really frustrated with myself. Most of the "experimentation" that I performed with the Android SDK could be reduced to clicking various fancy buttons, waiting for $thing to compile, only to realize this was not what I needed at all. In the end I was ripping my hair with this really nice GUI that I couldn't really use for anything. My problem seemed too 'low level' for it to be solved with the SDK.
I did also try flashing different ARM linux images onto the phone. There's ARM versions of at least Arch Linux and Kali Linux, and both of those would probably have the binaries to format the partition, and at least a package manager to get one. But of course a naive approach failed me; none of the images booted.
I didn't really care for going too deep into debugging what was wrong. Maybe the kernel had issues, I tried swapping it with the TWRP one, but maybe the ramdisk is wrong too, I didn't really know the 'common ground' between the TWRP kernel/ramdisk and those different Linux kernels.
It's not stupid if it works
I downloaded a tool from a very legitimate site, claiming it can fix my phone. Obviously it couldn't, it didn't even detect the phone in the first place. What caught my attention though was an 'oeminfo' folder with different Huawei products as subfolders. Curiously I open p9 and see a single .iso file inside.
Now in this moment I had this stupid idea. It was stupid because it was simple and naive. Just write the .iso into the oeminfo partition and be done with it. Now I knew I wasn't dealing with a linux system, but... well, it doesn't hurt to try, does it? After all, the oeminfo that is on the phone is already garbage.
Without much hesitation I boot up TWRP and adb push the .iso on the phone. I triple-check the partition number for oeminfo. Would suck to overwrite something else that's critical.
dd if=oeminfo-EVA-L09.iso of=/dev/block/mmcblk0p8 bs=4M
I stare at this command for a great while until finally pressing enter. Great mistakes have been made with hastily written dds.
The command finishes successfully and I reboot, full of skepticism that what I have done would actually work.
But here I am, greeted with the Huawei logo. No more test colors. No more intimidating red text. No more tears.
Compilation complications
Full of newfound enthusiasm I tackled the boot image for TWRP. Before this point these images were just blobs of binary data that I had no way of interacting with. But in order to get more binaries on the device, I would need to either
- Unpack the TWRP iso, put the binaries in, and repack it, or
- get ALARM to boot on the P9, tackling potential driver issues, get connected to the internet and download the required packages, or
- become ascended (a.k.a. a kernel programmer) and compile my own kernel and operating system from scratch.
Needless to say, as intriguing as the third option was, I went with the first one for its simplicity. Reading up on the boot images I quickly realized the importance of the file command. (I can't believe how long I have made it without knowing this!)
I quickly learnt that the boot image is "only" a gzipped cpio archive. A cpio archive is like a tarball - it contains files concatenated (or "tarred") together, headers in between containing metadata such as the location of the file, inode numbers and permission information.
Uncompressing the archive gave me access to the initial ramdisk for TWRP, and all the files including my beloved /etc/recovery.fstab. I found the binaries in /bin as they are supposed to, but there was something odd about them. They were all very small. In fact, they were not binaries at all; they were symbolic links. (Almost) all of the binaries linked to the same location: /bin/busybox. It seemed like there was some heavy optimization going on here.
After a while of reading up on busybox, I realized that I didn't need to somehow incorporate my own binaries into busybox; it's just something that packs the basic GNU tools for embedded linux with ease. That took a stone off of my chest, as it was one less step to take to get the phone hopefully working again.
I did a touch changed.txt to know the ramdisk was modified, compiled the new ramdisk and flashed it into recovery in fastboot mode.
And what do you know, it didn't work.
My initial guess was that there was an integrity sum of some sort, and adding that one file violated that sum. However, that theory was debunked quickly as uncompressing and compressing without changing anything yielded the same result. It was not the gzip compression, there was something wrong with my cpio step. Of course my debugging skills with the Android boot process were practically zero, so I was left with two possible states; either the phone boots up or it doesn't.
In the lack of documentation (or motivation to spend time trying to find said documentation about the P9 boot process), I decided to just mirror all the information I could from the TWRP boot image. The kernel byte offsets and the kernel command line weren't matching the boot image either, but fixing those didn't seem to help with the booting problem. So here I was, trying out different combinations of options with the cpio compiler, and seeing which one resulted in a successful boot and which one didn't.
In small bytes
While trying to successfully decompress and recompress the cpio file, I went deep down to the byte level to see what it actually was in the newly generated files that was wrong.
The first issue I immediately noticed was that the order of files was incorrect (different before and after decompression). The online tutorials (even the cpio man page!) unanimously suggested using find . -depth -print or a similar command. The problem here was that the default order for find was not in order at all; the files were printed according to the creation order for said files.
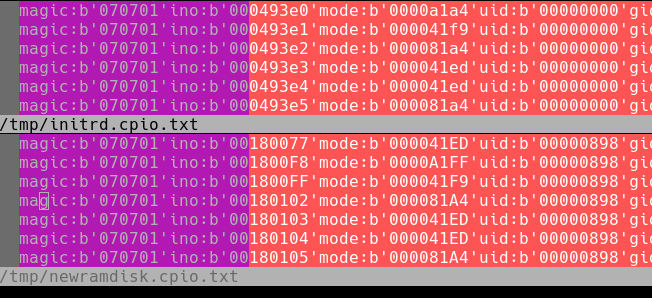
So in order to properly compare these two archives, I had to sort the file list before passing it to the binary. From here I could immediately see differences between the file headers, and there were multiple columns that weren't matching.
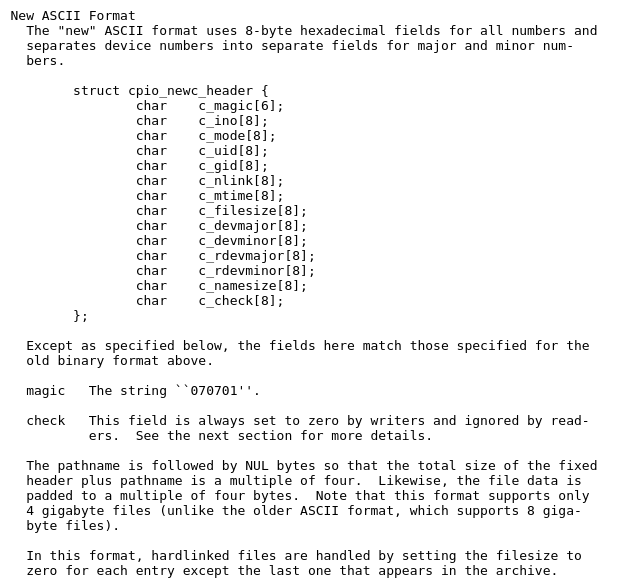
Cpio archives have multiple formats, but the one used by the Android kernel is of the 'newc' (SVR4/New ASCII) format. You can find the documentation for the format here, I've also included an image here for clarity.
So using this information I created a Python script that parses the headers and shows which columns don't match. In the GNU compiled image, the hex codes are uppercase, but in the original image they're lowercase. This rather amusing difference tells me that the compiler used to create the original was probably not the GNU one but a different one. Surely this cannot be the reason why it's not booting, right?
The inode numbers, uid, gid, and version information were not matching either. Diving into the GNU compiler I find a lot of command line arguments like --no-preserve-owner, --numeric-uid-gid, --force-local, but I decided against using them because I was lacking the time and the willpower to do so. Instead I decided to rewrite the fields in my Python script on the fly to match the end result I needed. A few hours of "keeping it simple" later I had a cpio archive that was practically identical to the original.
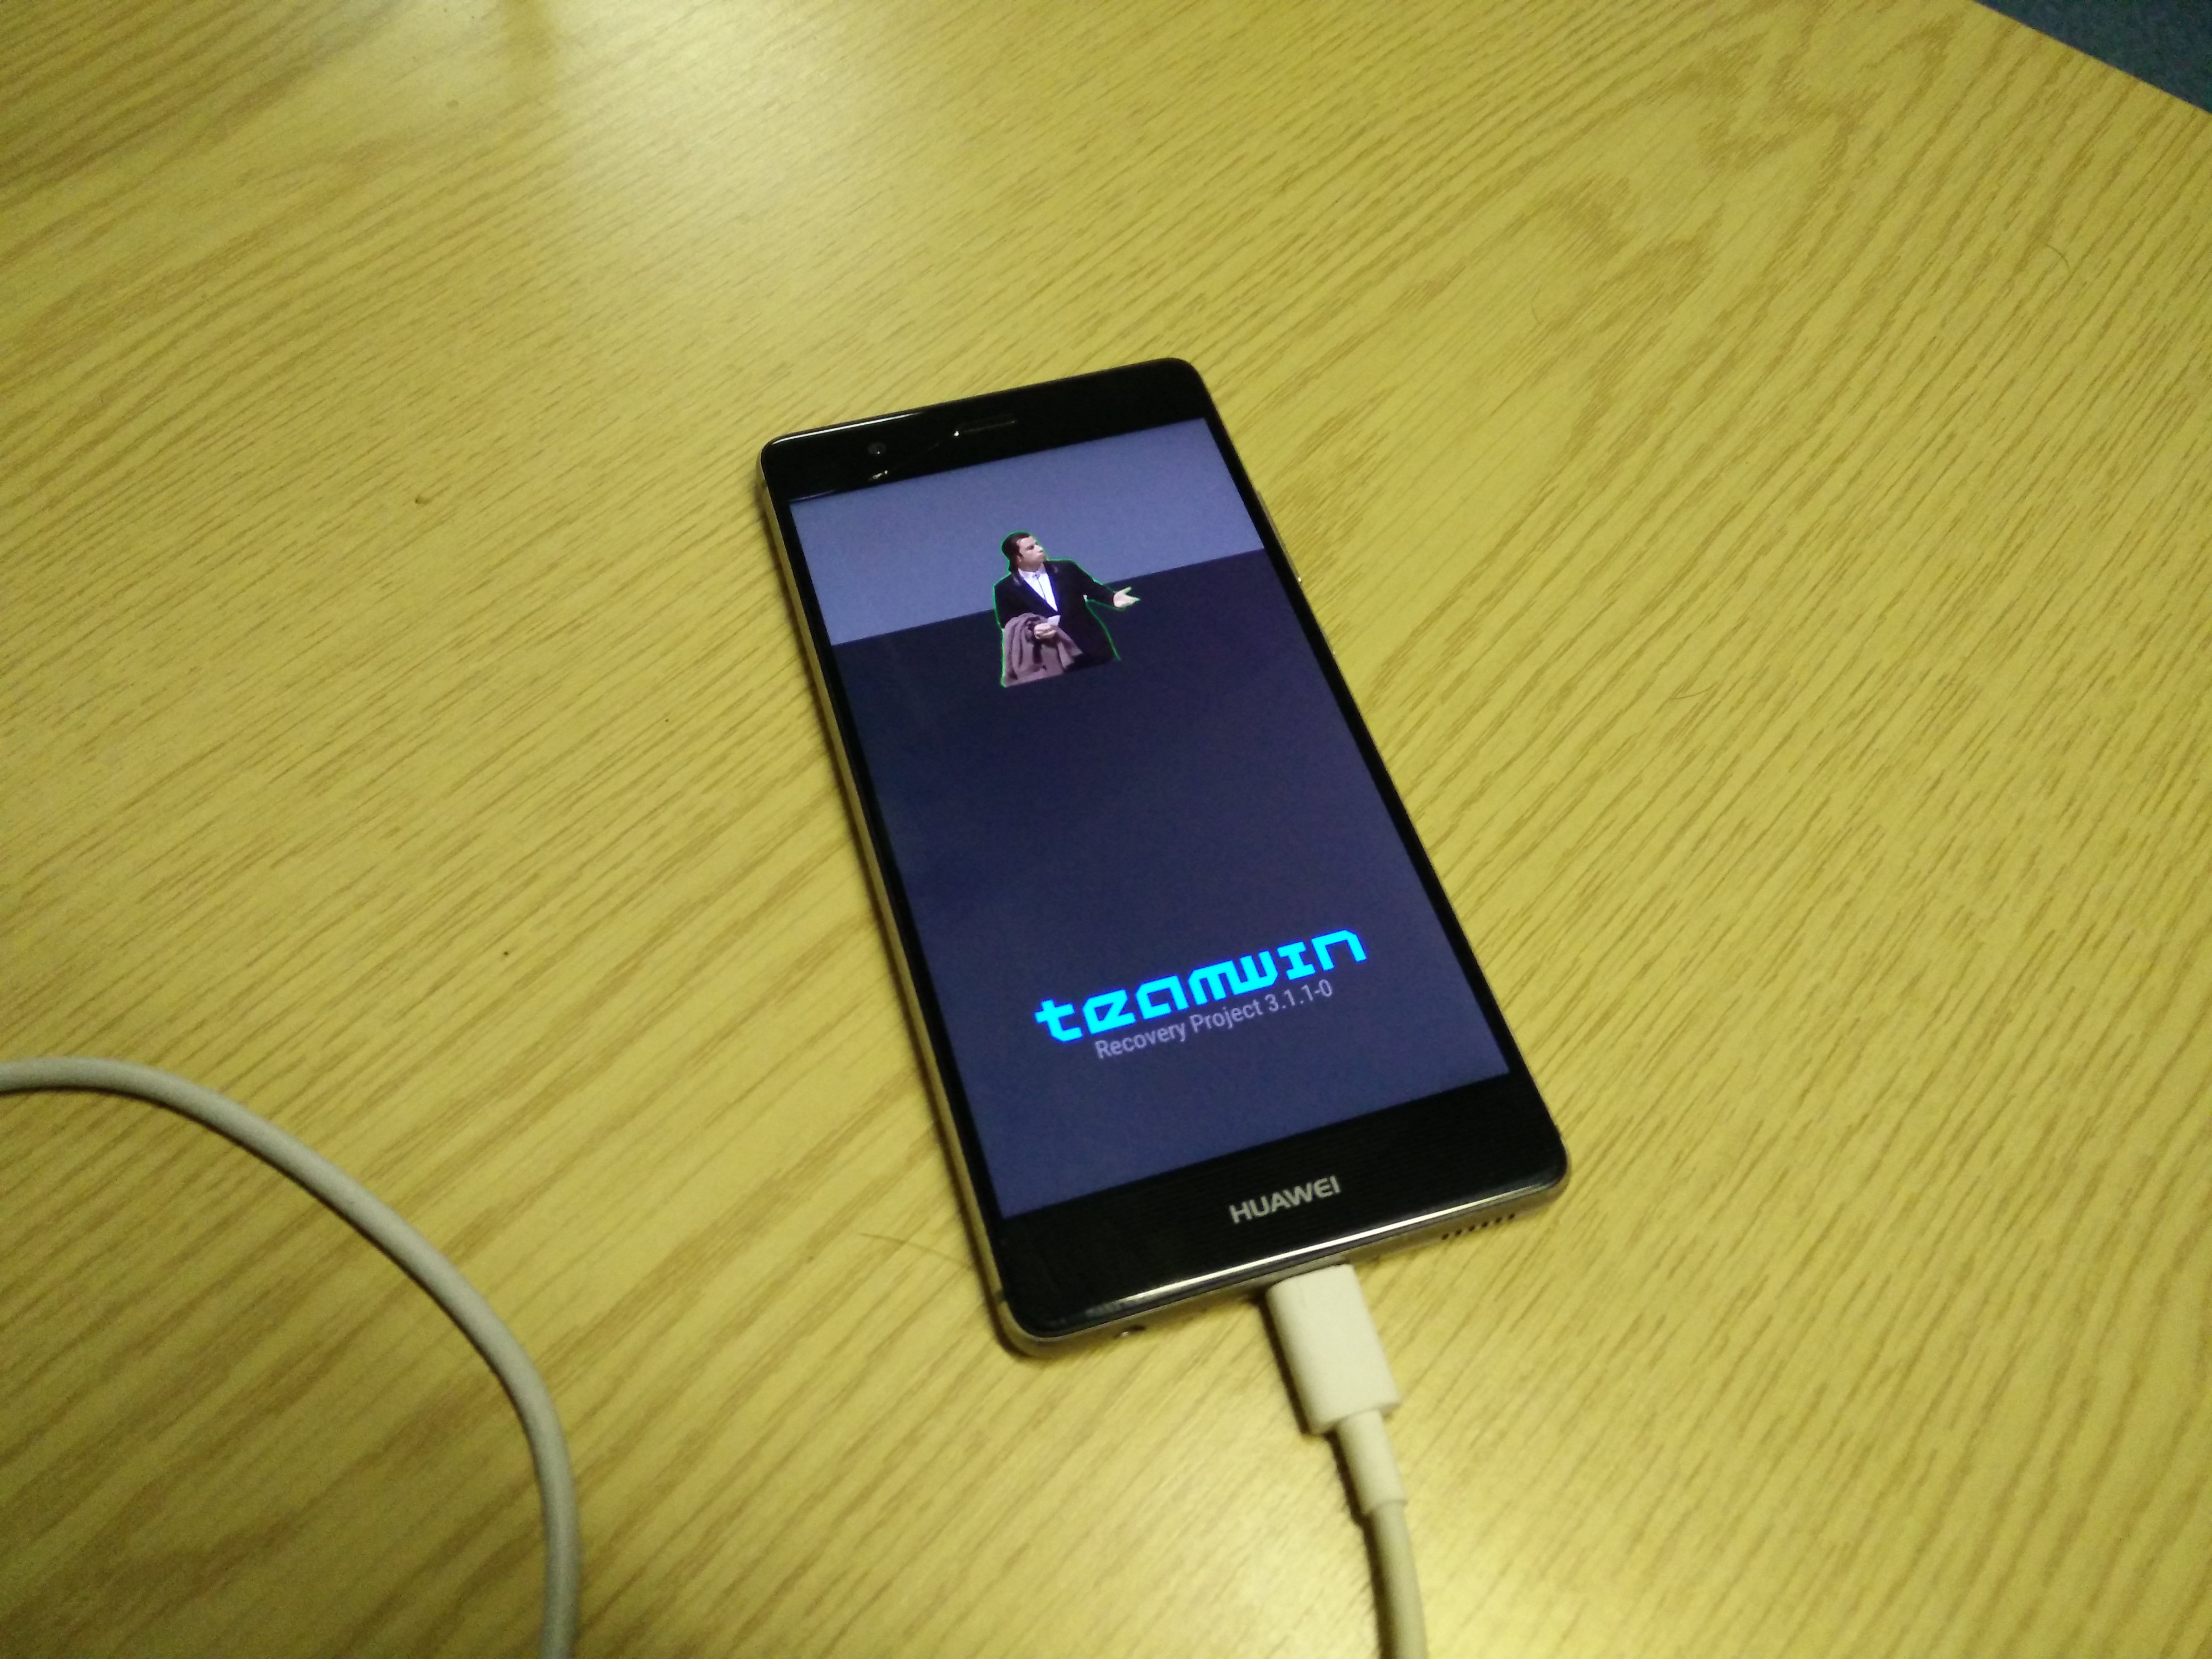
The rest of the process was in muscle memory already; gzip compile the cpio archive, create boot image from the compiled initial ramdisk and the TWRP kernel, flash image to phone using fastboot. I had changed a few files to be able to see at a glance if the repacking had really worked. The phone booted, and...
Never have I been happier seeing a confused Travolta. His expression represents my previous experience with Android one to one. Not that it's Android's fault, it's just me expecting everything will work the same on Android as on linux, being confused and flailing about when it does not.
Or it might just be me flailing about in general.
Roadmap
This is where I am with the project right now. I'll try to keep this updated as I progress through it.
Obviously the real road is going to be more bumpy than what you see here, but this is an optimistic view of the situation.
(EDITOR'S NOTE: I didn't keep this updated. The whiteboard has since been wiped, the room refurbished and given away to master's students, I have graduated from the university and left the entire country, and the entire country has left the EU. Wiping the whiteboard was a good decision though; look how dirty it was.)
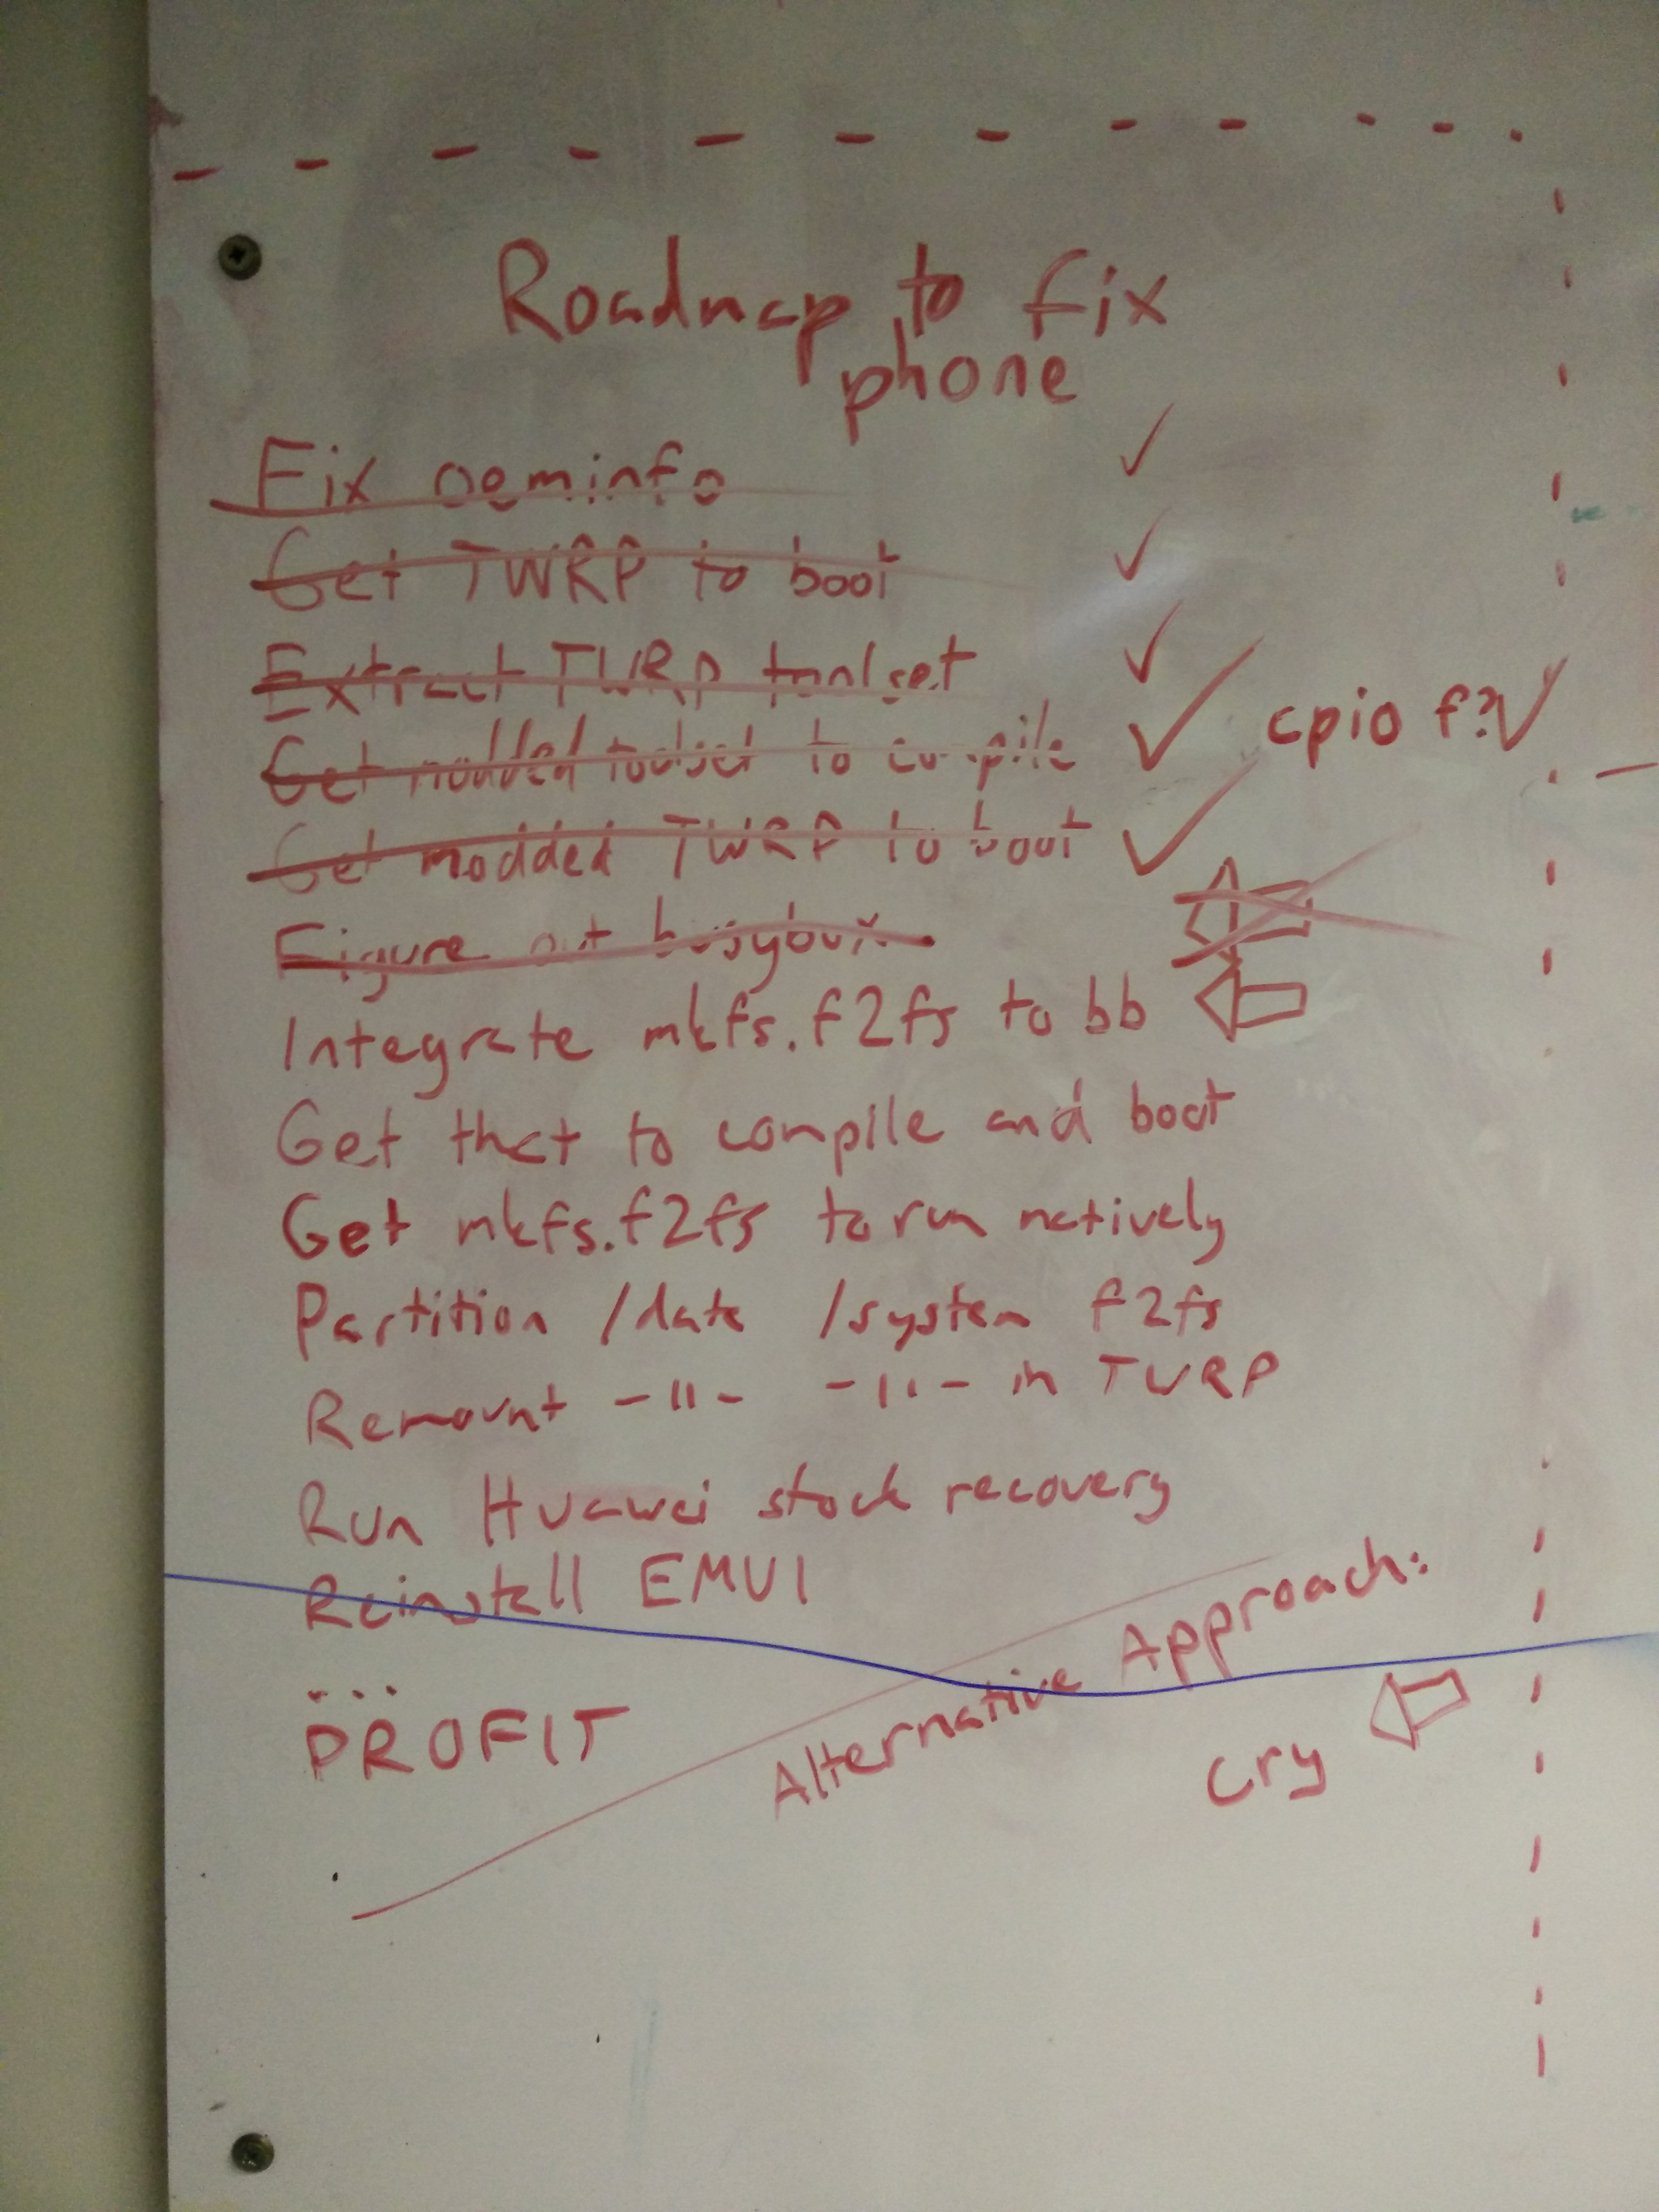
Roadmap to fix phone
Fix oeminfoGet TWRP to bootExtract TWRP toolsetGet modded toolset to compileGet modded TWRP to boot (fix cpio?)Figure out busybox- Integrate mkfs.f2fs to busybox
- Get that to compile and boot
- Get mkfs.f2fs to run natively
- Partition /data /system f2fs
- Remount /data /system in TWRP
- Run Huawei stock recovery
- Reinstall EMUI
- ...
- PROFIT
Season's Greetings!
Having got some of the ALARM binaries working, I realized I could probably find the repositories online for the rest of the software. Sure enough, I was able to download tarballs on my browser from the ALARM repository site, feeling like I was on Windows again.
I extracted the tarballs to the ramdisk root, recompressed the ramdisk and sent it over to the phone. Having ready-made scripts from before, everything worked smoothly as ever. I found myself particularly happy getting vim on the phone - TWRP only had legacy vi.
Unfortunately, not all fun lasts forever. Being able to run precompiled binaries on the phone is great, but it's not sustainable in the long run. At some point I will need to compile software on the platform by myself from source, as we're on linux Android after all.
Now I'm not a low-level expert. My mentality is, for the most part: Abstraction and convenience over performance. If I can write code fast that is readable, maintainable and runs fast enough, that's good enough for me. So far I've been perfectly happy developing on higher level such as Python and Ruby for starters.
Bearing this in mind, I created a small festive program in C that merely outputs Season's Greetings to stdout and exits with a code of 0. This simple program could be used as a debugging measure, however, as I knew its source code, libraries it uses, and it was extremely simple in function.
Having never cross-compiled before, it took me a while to find the proper gcc compiler to do the job. I used aarch64-linux-gnu-gcc to cross-compile my program that I reasonably dubbed as ./xmas. Sure enough, and a bit suspiciously, neither the compilation nor execution yielded any errors.
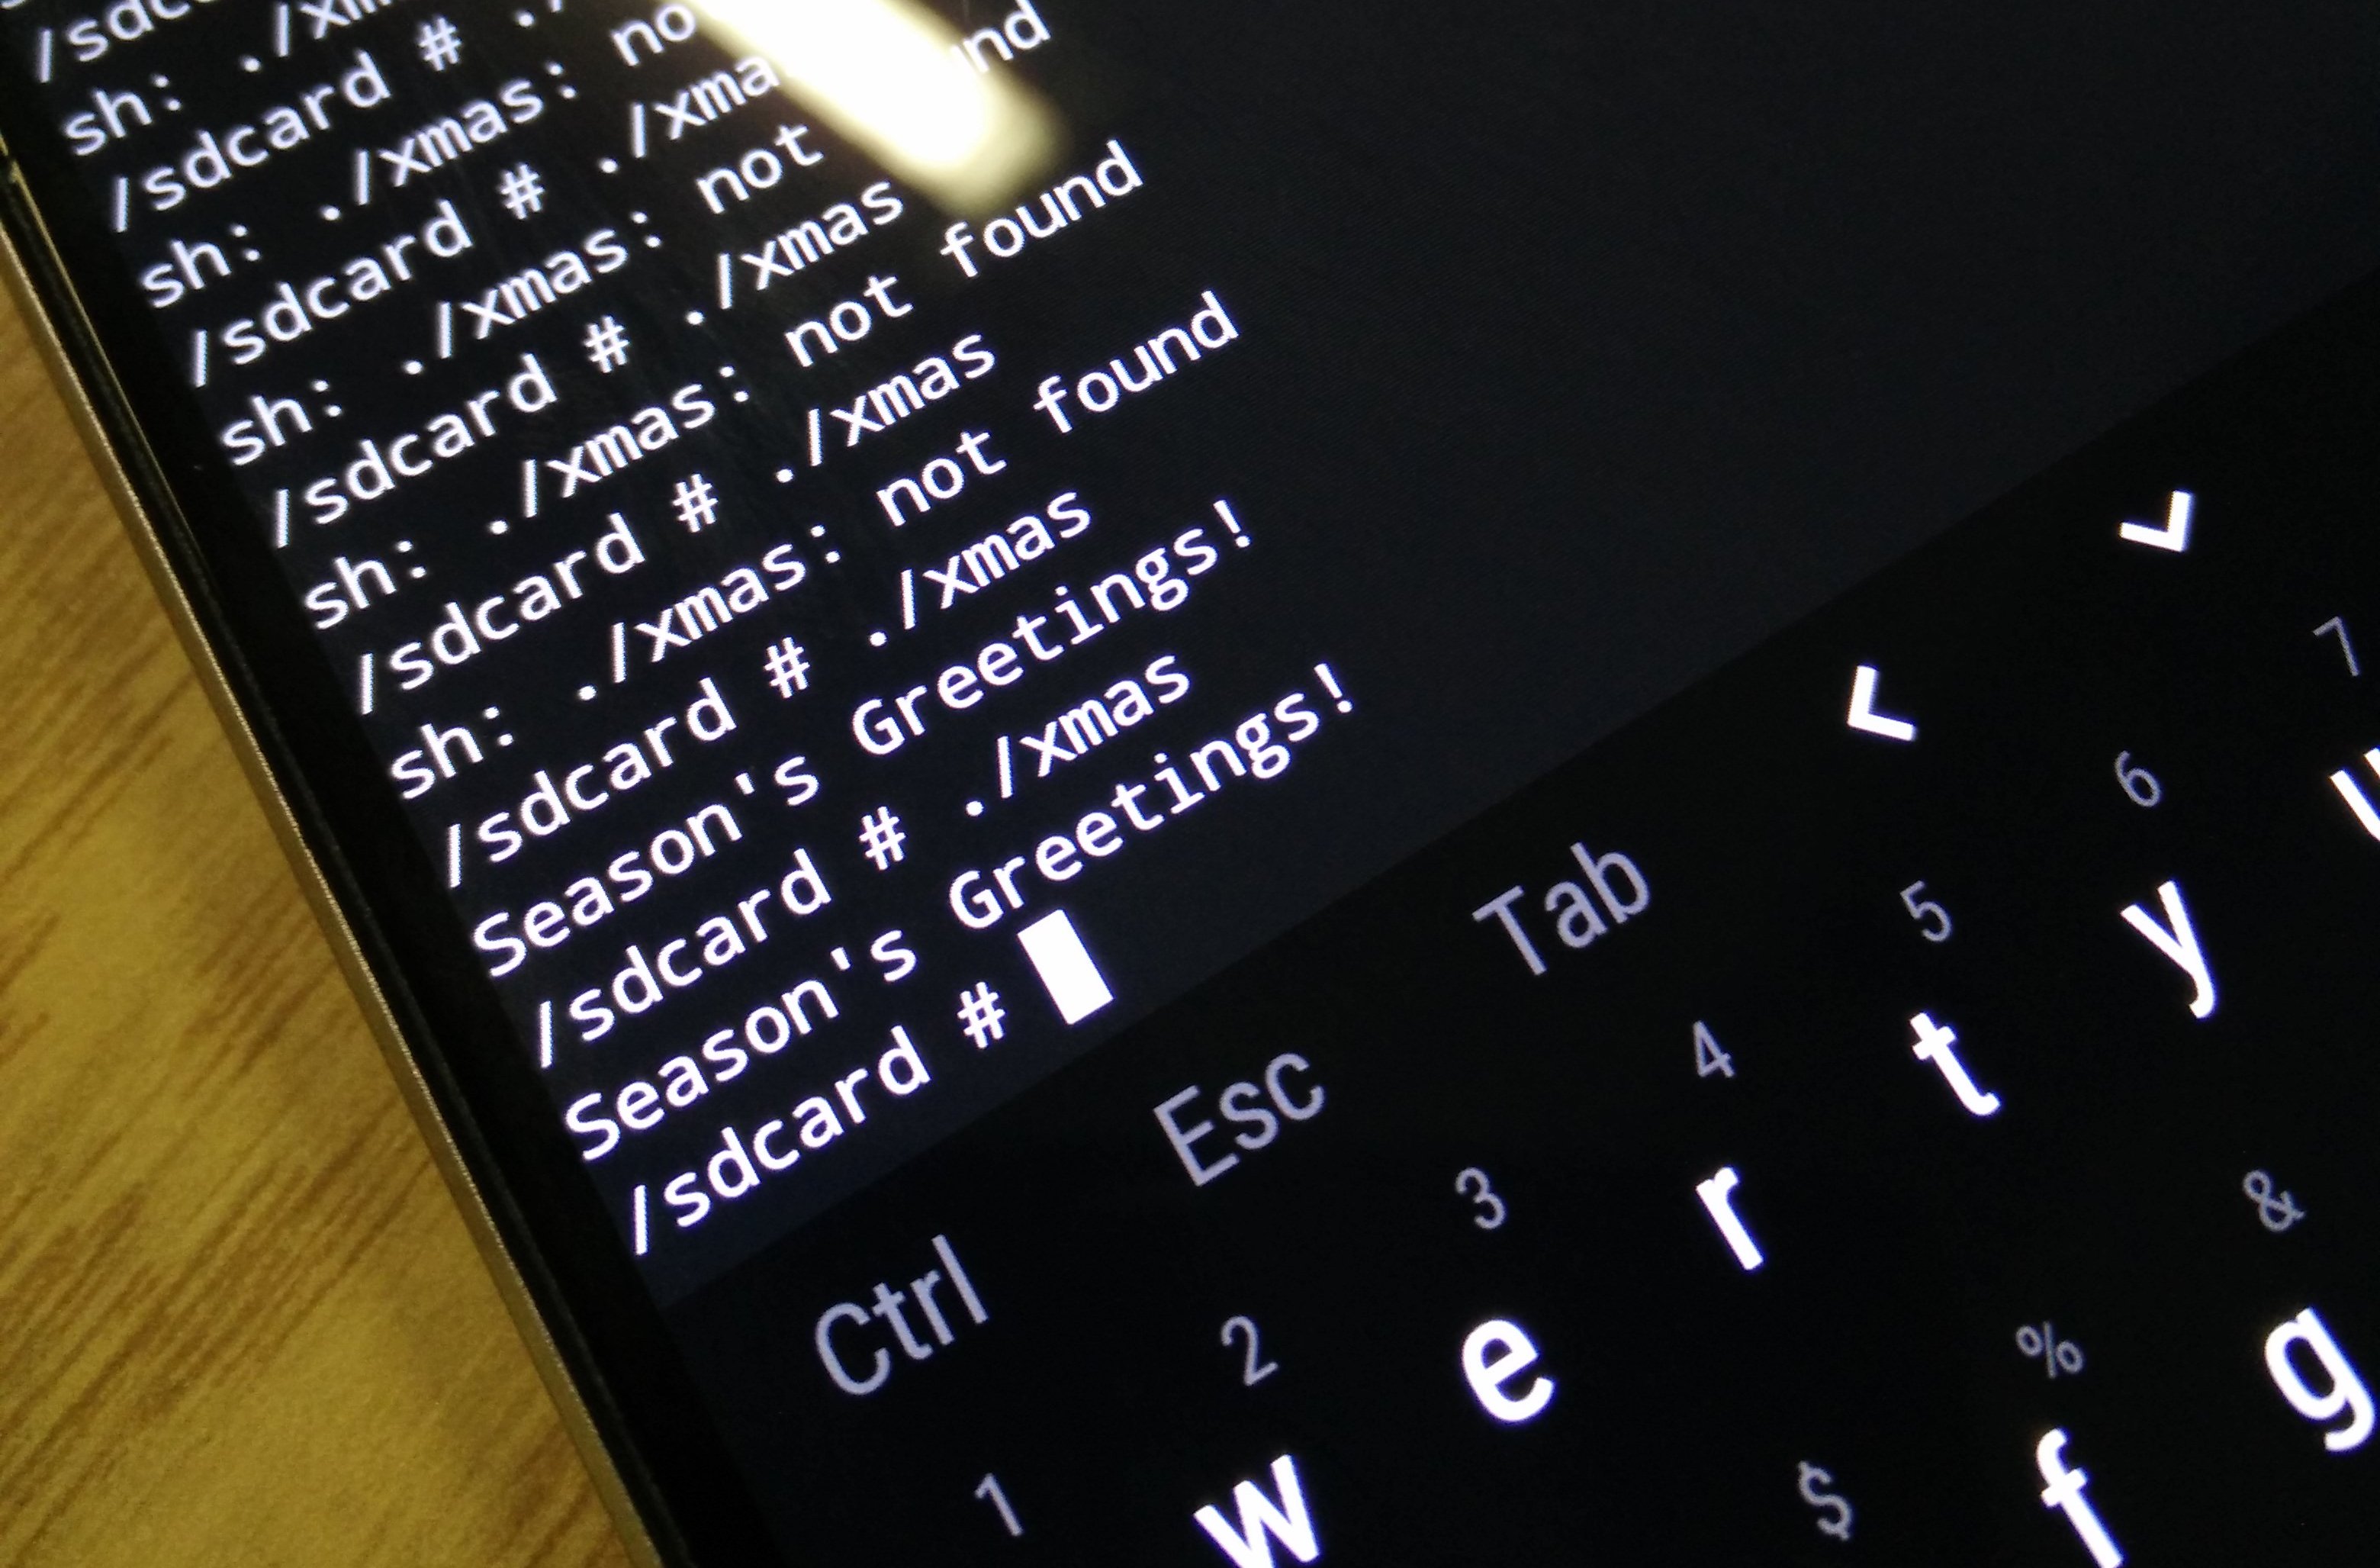
"Fair enough", I thought. I wasn't complaining if something was to work instantly for once.
Back to my /:ts
Getting the custom compiled images to properly boot on the P9 opened new doors to getting binaries working on the device. If I could get arbitrary binaries to run on the TWRP terminal, I could maybe run mkfs.f2fs and finally format the drives needed to fix the mount issues.
The ALARM image contained some binaries I could test to get to run. They're aarch64 compiled, so they should work on the phone too, at least in theory.
I chose to get the simplest possible binary to work with first: /bin/echo. If I could do that, then I would proceed to get some more complex binaries to run as well.
First thing I noticed is that there was no /bin on the TWRP root - only /sbin. On Arch, /bin is merely a symbolic link to /usr/bin, which contains all of the system binaries.
As I couldn't find /usr either, I decided to just recreate those folders manually on the TWRP image.
I used ldd to find the shared library dependencies of /bin/echo on my laptop's (x86_64) Arch installation, assuming that those libraries would be relatively the same for aarch64. Those were moved to /usr/lib (a folder I created), and I linked /lib to point to that folder.
Turns out when sh says echo: not found it doesn't mean the binary isn't found, but it also might mean that the linked interpreter is not found (in /lib). This was the case as I had forgot to move /lib/ld-linux-aarch64.so, the main interpreter for those Arch binaries, to the libraries folder.
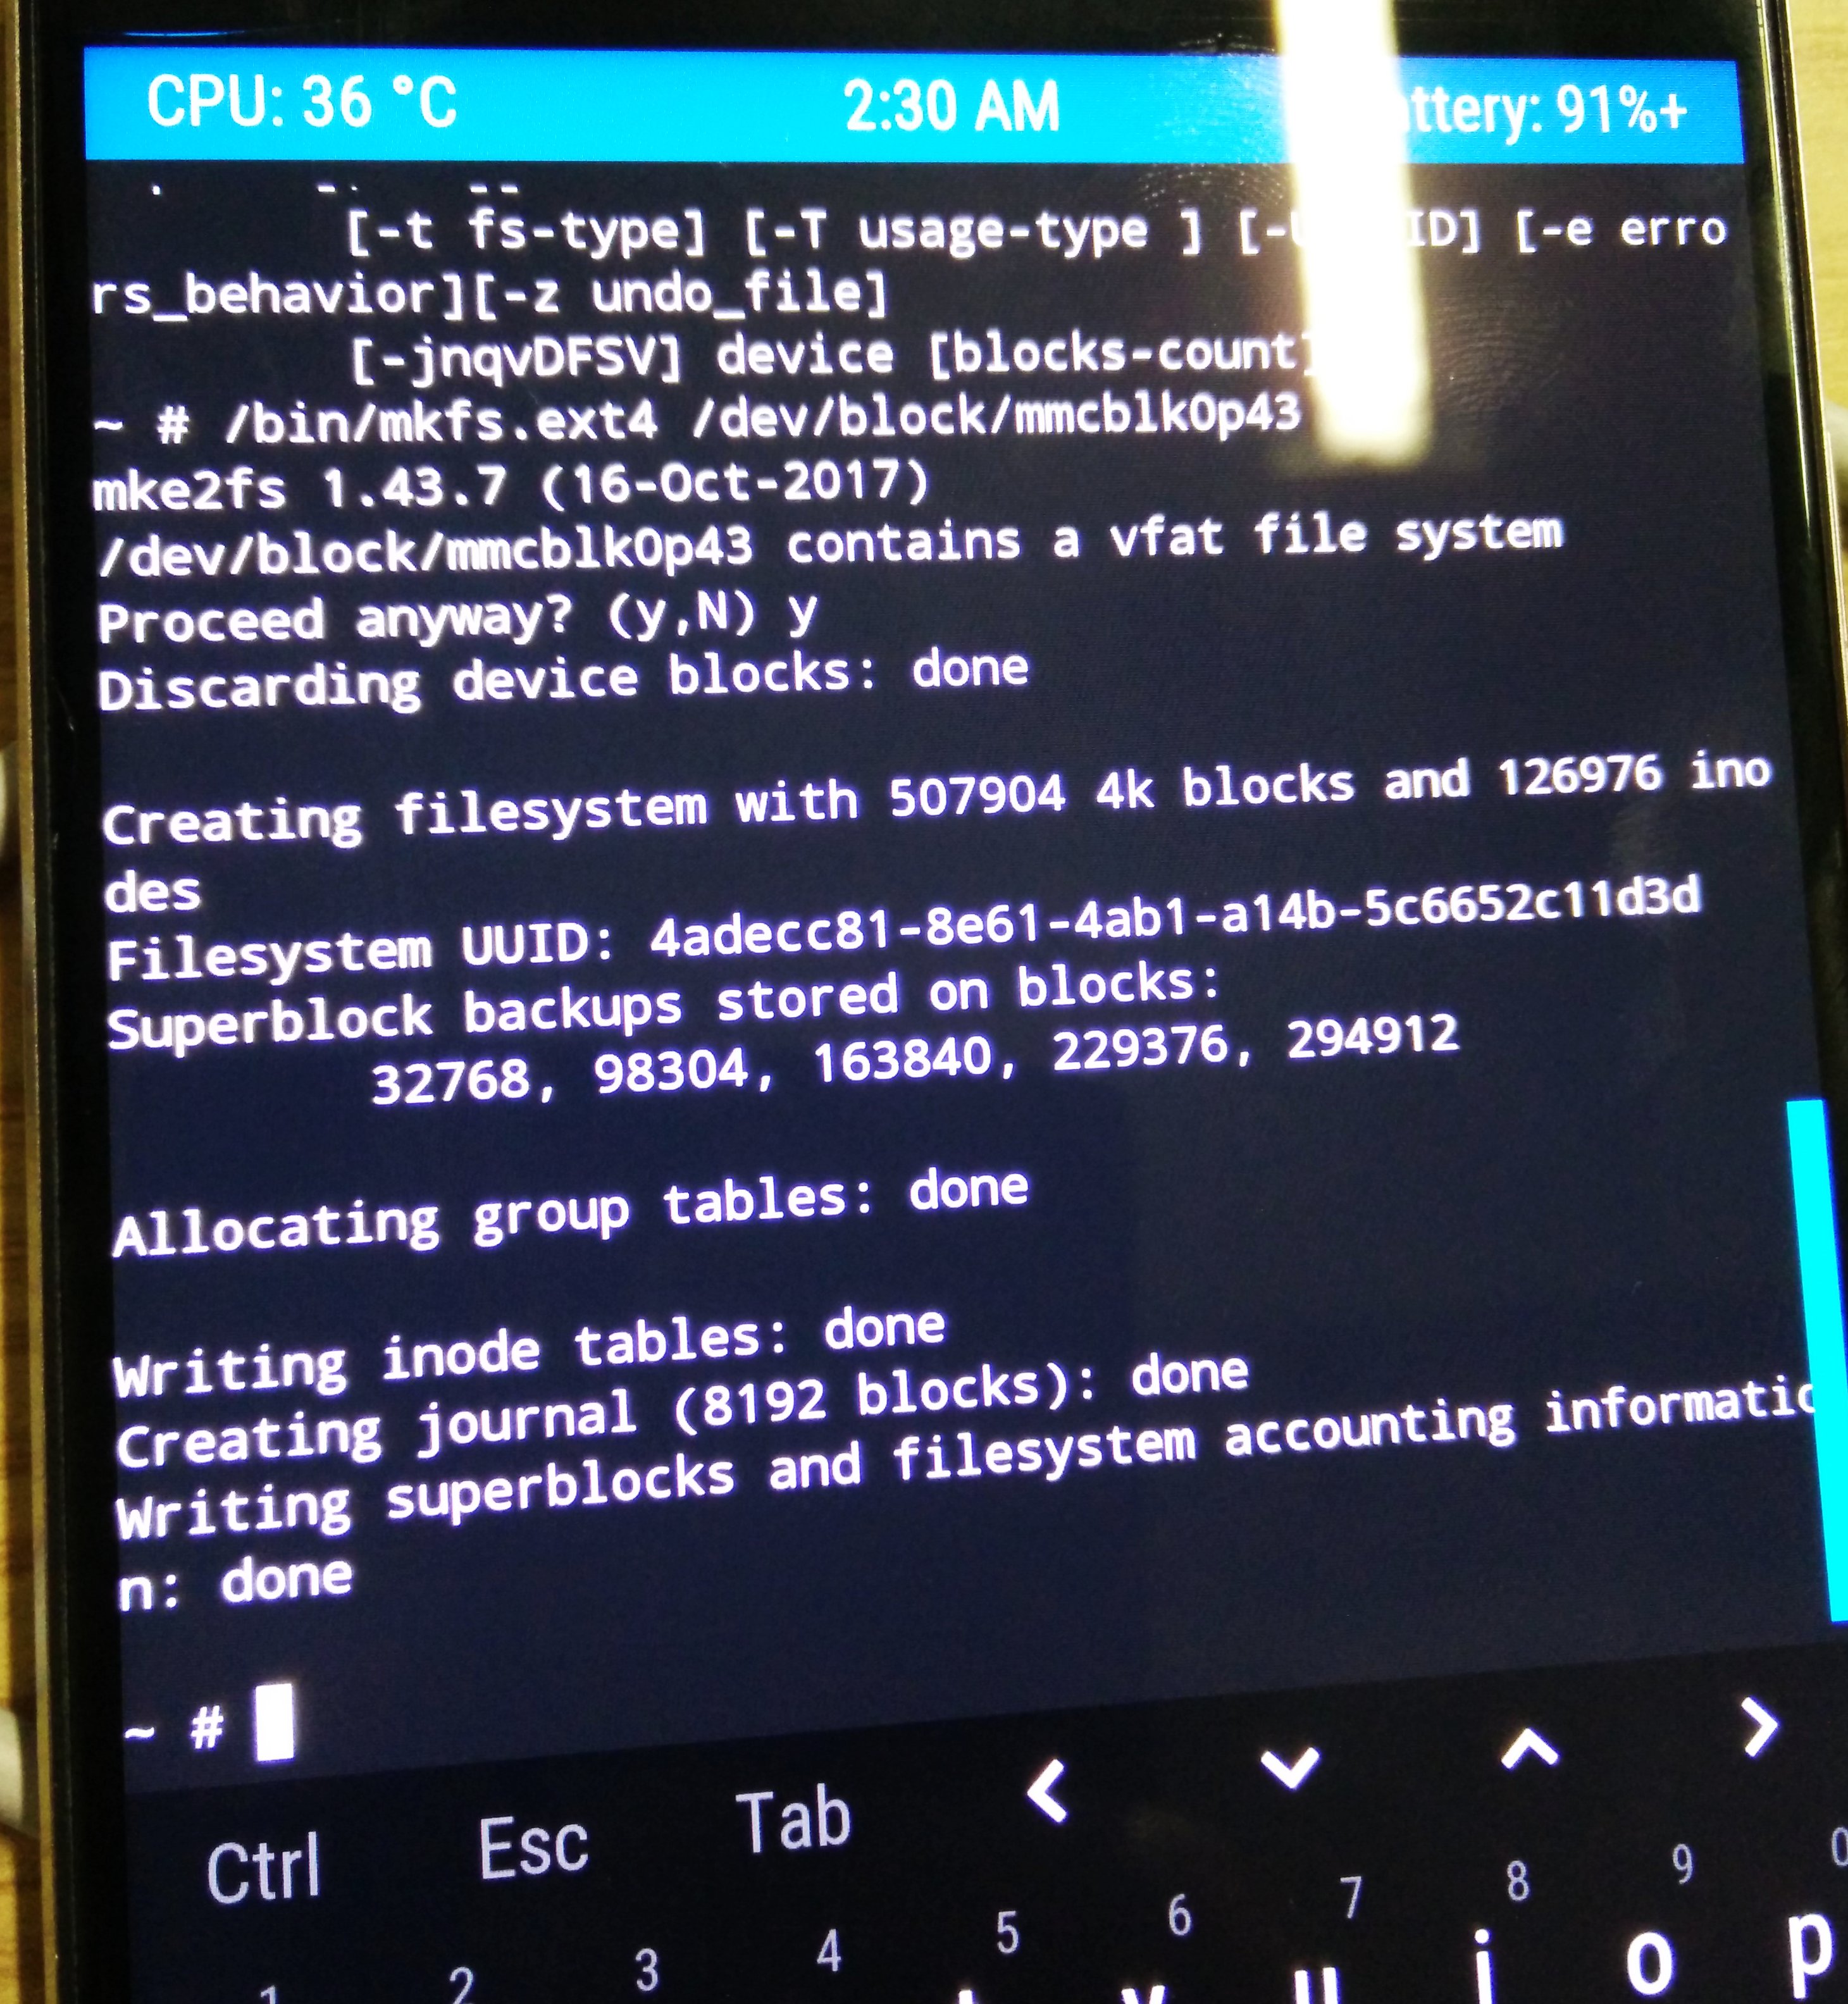
Having got echo to work, it was a breeze to get other binaries working as well, such as mkfs.ext4 and ip (the busybox ip command was segfaulting on the phone).
I triple-checked the device block that /system was pointing to, confirmed the partition in fact was not ext4 even though it was supposed to be, and used mkfs.ext4 to format the partition. mount /system was completed successfully, and the checkbox in TWRP started working.
Seeing a screen like this counts as a satisfying end for a day (or a night). While the path is not paved by sequential successes, small breakthroughs like this keep a developer happy.
What Happened?
Short answer: Nothing - my phone is still a brick. I haven't bothered to charge it for a while now.
I had various attempts in trying to get the proprietary Huawei wireless drivers working in order to make the device somewhat useful, maybe in a form of a fancy-looking Raspberry Pi. Perhaps you can already guess these attempts were largely fruitless.
There have been a few ideas rotating in my head what to do with the thing, after all it can run and compile some code.
The long answer is that life happened to take over (like it always does). Funnily enough I got hired into Google to develop some interesting systems as an SRE. Maybe I can ask about the phone if I bump into an Android expert in the corridor. That won't be an awkward conversation at all.
I'll keep the blog around to see whether the phone ever gets re-used for something, but as for now I wanted to write a little bit of closure: I'm not done with the device; the funny thing with life is that when you have a ton of high-priority items on your agenda, some of them end up being low-priority after all.
Some people have asked me what the purpose of this "blog" is. I look at it in terms of self-improvement. Maybe you can look at it as "what definitely not to do" or "the ramblings of a madman". Truth is, I do random things and see what is fun and what works out. It's not like anyone actually knows what they're doing, even if their composure says otherwise.
Maybe if I did have something to say, it would be this: Keep doing random stuff that you enjoy. And don't be discouraged when there's setbacks. There will be setbacks - lots of them - but you can always learn and change your approach until one day you've made it.
And that's what separates us from the machines.